Laravel Nova with your pipelines updated

Standard

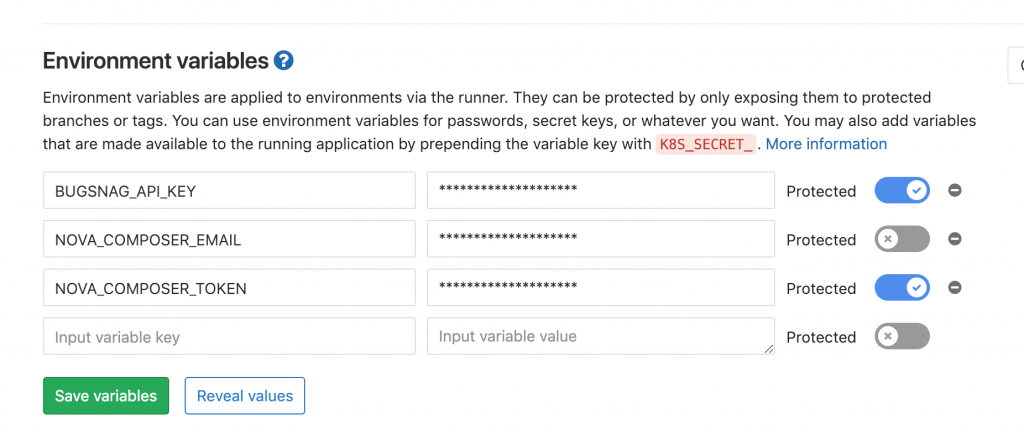
Shortly after I added ‘Laravel Nova with your pipelines‘ I stumbled across a tweet on using an environment variable with composer. So instead of maintaining an auth.json file in the repository and using sed to replace placeholders, you can just add a COMPOSER_AUTH environment variable with the entire contents.

GitLab environment variables page

There had to be a better solution and here it was. Nice and simple.

Laravel Nova with your pipelines

Standard

If you use Laravel Nova, you undoubtedly were happy when Taylor started allowing us to use composer to install and update Nova. By doing so you create or edit your ~/.composer/auth.json file with something like the following:

{
    "http-basic": {
        "nova.laravel.com": {
            "username": "your-email@your-email.com",
            "password": "your-super-secret-token"
        }
    }
}

On your dev machine you need this file, along with your production or wherever you are building / deploying your site. Using forge, this is a simple git pull and not a complicated deployment.

I setup a GitLab pipeline so that when pushing the master branch, it will run my unit tests, then trigger forge to do the deployment.

To get composer to install and not error out means we had to add auth.json to our repository and in our build steps, copy it to the correct directory. By using variables, we don’t need to store our credentials in that file. Our auth.json is literally what we have above. We are going to replace your-email@your-email.com with our custom variable in the Gitlab CI/CD Environment Variables page.

GitLab CI variables

Here is what our test stage looks like. The ‘- sed’ lines replace our placeholders in auth.json with the variables we defined above.

phpunit:

  stage: test

  script:
    - cp auth.json ~/.composer/auth.json
    - sed -i "s/your-email@your-email.com/${NOVA_COMPOSER_EMAIL}/g" ~/.composer/auth.json
    - sed -i "s/your-super-secret-token/${NOVA_COMPOSER_TOKEN}/g" ~/.composer/auth.json
    - composer install --prefer-dist --no-ansi --no-interaction --no-progress --no-scripts
    - cp .env.testing .env
    - php artisan key:generate
    - phpunit --colors=never

There may be a more elegant way to achieve this, but this works and doesn’t jump through too many hoops.

Gutenberg blocks disabled, thoughts after I fixed it

Standard

When I first experienced Gutenberg when upgrading to WordPress 5 it was a terrible experience. The ‘+’ new block icon didn’t work, and I couldn’t figure out how to add any blocks. It gave me one to jam everything in.

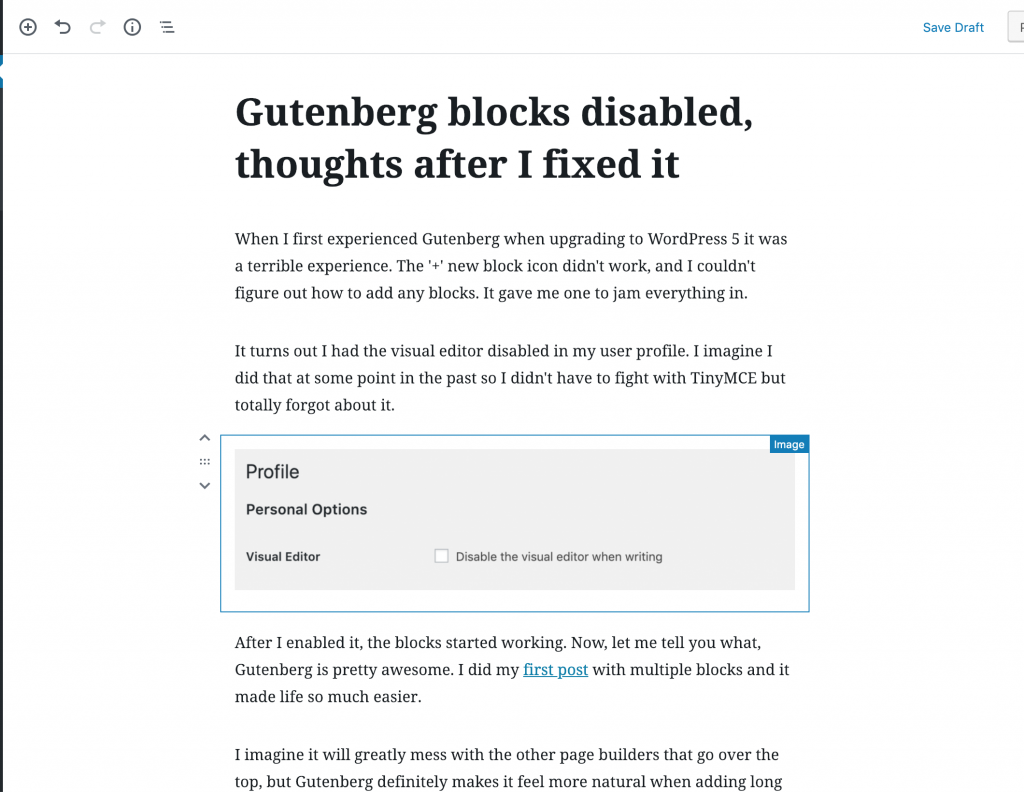
It turns out I had the visual editor disabled in my user profile. I imagine I did that at some point in the past so I didn’t have to fight with TinyMCE but totally forgot about it.

Disable visual editor was disabling Gutenberg

After I enabled it, the blocks started working. Now, let me tell you what, Gutenberg is pretty awesome. I did my first post with multiple blocks and it made life so much easier.

I imagine it will greatly mess with the other page builders that go over the top, but Gutenberg definitely makes it feel more natural when adding long form content.

Advice for WordPress/Automatic/Gutenberg Team

Please, please, please, for the first time a user loads the editor page and has the visual editor disabled, show some sort of warning and just don’t show the ‘+’ new block button. It was extremely confusing and frustrating.

Gutenberg image block

Tailwind CSS, I try it out on the TodoSage website

Standard

When building websites it’s so easy to just grab Bootstrap or Foundation and take off running. Better yet, grab a theme off of one of the many theme sites who integrate bootstrap for you and go. Tailwind CSS has always been in the back of my mind as I have a few courses from the author and the people I follow on twitter are friends with them.

While I wasn’t happy with the TodoSage.com site, I decided to give Tailwind CSS a try. I have looked at it a few times but only had big projects that I could use it on. Basically it was just too big of a leap for me to take at the moment.

One of my goals before the new year was to replace the Todo Sage site with a new one that included screenshots. In doing so, I decided to give Tailwind a try as it’s just a few pages.

Tailwind CSS Homepage

I have done ‘utility’ style classes in many projects. .pl-15 (padding left 15), mb-10 (margin bottom 10) and much more. Tailwind as built as a utility framework and comes with a lot of classes. To make things easier, they have a config file where you can define colors, margins, and all sorts of things it uses to generate classes. This actually made it really easy to keep ‘on brand’ in the HTML. Here is a purple button, and on hover it should be ‘purple-darker’.

By removing the theme I used in the past, this will make it easier to iterate and try things out.

Things I like about Tailwind

There are a bunch of things I like about Tailwind.

  1. The configuration file is well documented with comments inside it. This makes it much easier to understand and doesn’t come across as overwhelming.
  2. It just looks good. If you look at the examples and work towards mimicking it at first, it comes out looking pretty decent.
  3. Once you understand the ‘formatting’ or ‘syntax’ of the classnames, it’s super easy to use and guess. If you have used ‘font-light’ it’s easy to guess ‘font-bold’.

Things I don’t like while using Tailwind

  1. The setup is a bit confusing. You can of course load their CDN version that gets their defaults. But to match what you need, you of course need a local install of it. They provide multiple scenarios, but the install page makes it look scary. I am never confident I have it working until I see that it is.
  2. This isn’t on Tailwind, as they provide reasonable defaults, but it’s easy to not remove the stuff you don’t need. The default config comes with black, grey, white, red, orange, yellow, green, teal, blue, indigo and purple. Most of those have darkest, darker, dark, (base), light, lighter, and lightest. If you don’t remove the colors you don’t use, you end up with a lot more classes than you need. This is more of a newbie mistake.
  3. The examples are beautiful and a great way to get started, but make sure to remove all the classes you don’t need on the elements. A section that just has text centered probably doesn’t need flex classes. Again, as a newbie mistake, it’s too darn easy to just grab and go.

Bottom line, I like Tailwind and the more I use it, the more I like it. All 3 things I don’t like about it will disappear as I become more familiar with it. It certainly made spinning up a restyle of TodoSage easier and not a 6 month process.

Not sold yet? Follow them on twitter.

PHP Mcrypt on OSX with XAMPP

Standard

HTML CodeWas composer not able to find the mcrypt PHP extension? When I developing on my local machine I use XAMPP because it is easy to setup. I also tend to use Laravel for a lot of projects as well. If you are using the same, when doing a composer update you have no doubt encountered this error. Mcrypt PHP extension required.

Writing lock file
Generating autoload files
Mcrypt PHP extension required.
Script php artisan clear-compiled handling the post-install-cmd event returned with an error

It turns out there is an extremely easy way to fix this. Simply update your .bash_profile with the following text:

export PATH=/Applications/XAMPP/bin:$PATH

This will find the XAMPP version of PHP that has mcrypt installed first instead of the one that comes with OSX.

The .bash_profile file allows you to have user defined settings when using Terminal. If you want to user a different version of PHP, you can change it here. Do you want to setup shortcuts? A lot of people will create a shortcut so that ls -l can be run by typing ll.

To do that enter the following in your .bash_profile file.

alias ll="ls -l"

If for some reason you don’t have a .bash_profile, create it in your root user directory. If your username is jeff, the file will be /Users/jeff/.bash_profile.

After you have made your change you may need to source your profile. Execute the following command inside terminal to do it.

source ~/.bash_profile

Once this is done, you should be able to do a composer update without any errors occurring.

Image courtesy of Baitong333 / FreeDigitalPhotos.net

Deploying Laravel with Capistrano

Standard

I am always looking for better ways of deploying me code. In the past I have used Fabric to create a deployment process. Although I use git, I have never used it for deployments. With Fabric I copied my code to another folder, did any processing such as removing files, or setting a environment variable and then uploaded the package. I was able to create versioning. Each deployment went to it’s own folder and symlinks to the document root were created. In the event the deployment gets botched I can easily login and re-link to the previous deployment.

On a new project I recently launched I have started using Capistrano. If you are a Laravel user check out this tutorial from TutsPlus.

Using Capistrano, I can run a command and it will rollback for me. With the default setup I have also switched to git based deployments. Both GitHub and Bitbucket allow you to enter deployment keys for your server. These are SSH keys but have read-only access to pull down the changes.

What I like with this approach is that the client side deployment script only relies on having access to the server. No longer am I defining paths where to copy files to if I have to deploy from my laptop versus my desktop.

What I don’t like is the “config” folder in my root project. It’s quite vague but I haven’t looked to see if I can change the name. One thing I am looking to do is write the release name to a php file so I can use it for things like cache busting.

Why It’s Good to Apply to Multiple Jobs

Standard

Shaking hands at job When I was looking for a job I had applied to quite a few positions. Several lead to phone interviews, and a little less than that lead to in-person interviews.

The place I landed at (company A), I had applied to a few weeks before hearing a response back. During that time I had done a few other interviews. One had been over the phone with another media company (company B) here in town. I didn’t hear back from them and it was a lot of WordPress stuff so I wasn’t particularly thrilled with that. When company A got back with me we did an interview and then the next day another to meet the owner of the company. They explained to me what the job was, who their client base was, the benefits etc. Lastly, they explained they wanted to do a contract job to make sure I could do it before hiring me. The project was still in the design stage they would get back to me with the details soon.

The next week or so, the same person from company B called me back. He had forgot he already called me once but this time it was for an in person interview. No problem as I live within 2 miles of their offices. An hour later, company A mentioned they would like the contract-to-hire to start ASAP. As someone who had been looking for a job for a little while, could this get any better? I let them know that the following Monday would be the best and that I have an interview with another company (company B) this Thursday but I wasn’t sure if I would take the company B position if offered.

What came next was quite the shocker. Minutes later I got a response back asking if I was offered the job right now (hired, no contract work), would I cancel my interview? Even though it was a risk, I said yes. Once I got the employment agreement and made sure everything was as expected I fired off an email to company B canceling my interview. So by applying to multiple jobs, you might be able to get a better offer when finding that perfect place.

Image courtesy of stockimages / FreeDigitalPhotos.net

WordPress Plugins Galore and How You Should Use Them

Standard

With WordPress it is so easy to install any plugin in their directory. Do a search for it and click “Install”. Whenever I am tasked with finding and fixing a hacked site it is almost always an issue with plugins.

One one particular site they had 2 “Hello Dolly” plugins installed. If you have ever used a fresh install WordPress includes 1 called Hello Dolly as an example plugin. You should always remove this plugin. There isn’t a security issue with it, but you should only have used plugins installed. This site had a bunch of unused plugins so there was no quick way to notice that a new one was added. The second Hello Dolly plugin was not active but the script was called from a remote server and was then used to send spam, lots and lots of spam.

Outdated Plugins

Many plugins get updates for security issues along with bug fixes and new features. A year a few of the very popular caching plugins had a critical security update. I still come across sites who haven’t updated them. When your site runs how you want very rarely do you bother to do updates or even login to the dashboard. Even before that there was the timthumb exploit. This script took your images and created thumbnails. While this wasn’t necessarily WordPress specific, it was used it tons of plugins and themes. I assume most of the plugins and themes released updates to fix the issue by either utilizing the built in uploading tools WordPress provides or upgrading to Timthumb 2.0 which fixed those holes.

Unused Plugins

Open a new window in your web browser and login to your WordPress site. Next go to the Plugins section and delete all the inactive plugins. Just because your plugin is not active does not mean it can’t do any harm. It just means WordPress won’t load any actions or filters it has setup.

Your plugins directory is usually located at /wp-content/plugins. If a hacker find an exploit in one of your installed plugins they already know where the file is. With the timthumb exploit stated above, attackers would send that file a malicious request and it would write it to the server. From there they could access whatever they needed to. Most the time it was to have the server you are on send spam. Your web host won’t like that. Not only would your site be hacked and need to be cleaned, but then the IP address of the server might get blacklisted for sending email and your web host will suffer from that if not caught soon enough.

Sending spam isn’t your problem, I get that. It’s just an example of what I often see. They can also modify your pages and posts. One I came across was inserting a link into every page. Another one added in advertisements to the bottom of every post. While ads might not be a bad thing, it would be nice if you got credit for them and to know they didn’t include anything malicious.

If you install a WordPress firewall plugin that emails you blocked requests you will eventually come across a request trying to exploit a plugin that you don’t have installed. These attackers build a list of WordPress sites and uses an automated process to try and exploit your site. If they find one great (for them), if not they just move on to the next site.

At the end of the day keep your plugins, themes and WordPress itself updated and remove unused plugins.