Laravel Nova with your pipelines

Standard

If you use Laravel Nova, you undoubtedly were happy when Taylor started allowing us to use composer to install and update Nova. By doing so you create or edit your ~/.composer/auth.json file with something like the following:

{
    "http-basic": {
        "nova.laravel.com": {
            "username": "your-email@your-email.com",
            "password": "your-super-secret-token"
        }
    }
}

On your dev machine you need this file, along with your production or wherever you are building / deploying your site. Using forge, this is a simple git pull and not a complicated deployment.

I setup a GitLab pipeline so that when pushing the master branch, it will run my unit tests, then trigger forge to do the deployment.

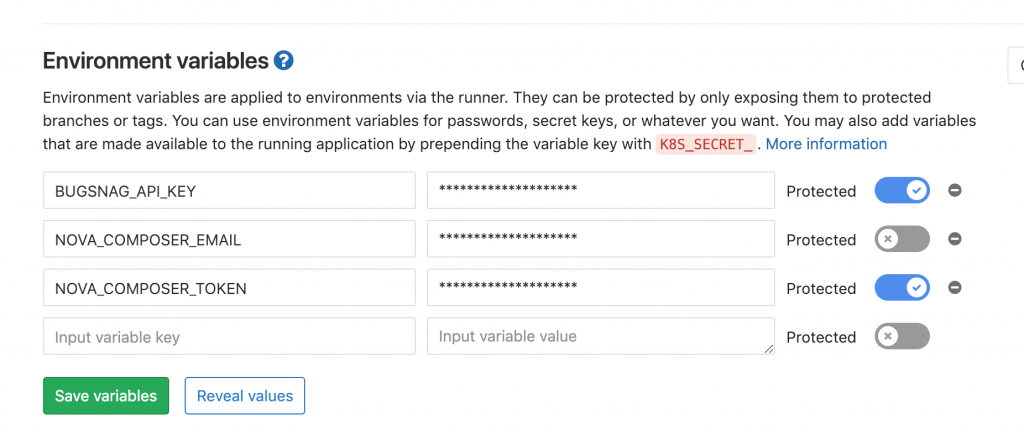
To get composer to install and not error out means we had to add auth.json to our repository and in our build steps, copy it to the correct directory. By using variables, we don’t need to store our credentials in that file. Our auth.json is literally what we have above. We are going to replace your-email@your-email.com with our custom variable in the Gitlab CI/CD Environment Variables page.

GitLab CI variables

Here is what our test stage looks like. The ‘- sed’ lines replace our placeholders in auth.json with the variables we defined above.

phpunit:

  stage: test

  script:
    - cp auth.json ~/.composer/auth.json
    - sed -i "s/your-email@your-email.com/${NOVA_COMPOSER_EMAIL}/g" ~/.composer/auth.json
    - sed -i "s/your-super-secret-token/${NOVA_COMPOSER_TOKEN}/g" ~/.composer/auth.json
    - composer install --prefer-dist --no-ansi --no-interaction --no-progress --no-scripts
    - cp .env.testing .env
    - php artisan key:generate
    - phpunit --colors=never

There may be a more elegant way to achieve this, but this works and doesn’t jump through too many hoops.

Adding Facebook Pixel to Google Tag Manager

Standard

Adding the Facebook pixel to your Google Tag Manager account is really quite easy.

To start, let’s go to the Tags page and click the ‘New’ button. Where it is named ‘Untitled Tag’ go ahead and change that to ‘Facebook Pixel’. This is for informational purposes only.

Next, click ‘Choose a tag type to begin setup…’ and you are going to select ‘Custom HTML’. In the multi-line text box that opens, you will want to paste your Facebook pixel code there.

Down under ‘Tag firing options’, select’ Once per page’.

After that we are going to select our trigger. You are going to want to use the ‘All Pages Page View’ trigger that comes by default with your tag manager account. After that, you will want to click save.

Example facebook pixel configuration
Example Facebook Pixel setup

The last thing to do is submit your changes so they can be live.

To make sure you have it setup correctly, you can use the Facebook Pixel Helper that Facebook offers for free from the Chrome web store,

Chrome store link

Google Tag Manager ‘Page View’ tags not firing

Standard

If you landed on this page, you are probably trying to figure out why your ‘Page View’ tags aren’t firing. I ran across this problem myself, and that is why I am writing this blog post.

First up, make sure your Google Tag Manager is added to your site. This sounds dumb, but it is the first step we have to take. You should find code like below inside the <head> </head> tags of your website.

<!-- Google Tag Manager -->
<script>(function(w,d,s,l,i){w[l]=w[l]||[];w[l].push({'gtm.start':
new Date().getTime(),event:'gtm.js'});var f=d.getElementsByTagName(s)[0],
j=d.createElement(s),dl=l!='dataLayer'?'&l='+l:'';j.async=true;j.src=
'https://www.googletagmanager.com/gtm.js?id='+i+dl;f.parentNode.insertBefore(j,f);
})(window,document,'script','dataLayer','GTM-MYGTMCODE');</script>
<!-- End Google Tag Manager -->

Now this is a basic setup. As long as that code is in there you should be good. Next, the question is, are you using the data layer? If you are, you of course added the following snippet of code like the examples show.

<script>
    dataLayer = [];
</script>

Now here is where the magic broke or happens. You may have skimmed over it, but that code needs to be ABOVE your Google Tag Manager code. I found that if it is below it, it will break the events and not fire correctly.

A correct implementation looks like the following. Make sure to update the tracking ID (this page example is: GTM-MYGTMCODE with your actual tracking ID.

<script>
    dataLayer = [];
</script>
<!-- Google Tag Manager -->
<script>(function(w,d,s,l,i){w[l]=w[l]||[];w[l].push({'gtm.start':
new Date().getTime(),event:'gtm.js'});var f=d.getElementsByTagName(s)[0],
j=d.createElement(s),dl=l!='dataLayer'?'&l='+l:'';j.async=true;j.src=
'https://www.googletagmanager.com/gtm.js?id='+i+dl;f.parentNode.insertBefore(j,f);
})(window,document,'script','dataLayer','GTM-MYGTMCODE');</script>
<!-- End Google Tag Manager -->

I place this code as high in the <head></head> tags as I can. Hopefully this solved your problem of the Page View event not firing when it should have.

Google Tag Manager and how to use it. The basics.

Standard

Have you ever wondered what Google Tag Manager (GTM) is? Does it seem complex to you? Did you notice that the new Google Analytics script references tag manager?

There are 2 main components we are going to talk about. The first is tags and the second is triggers. In the image below, we are looking at the tags section of one of my website GTM accounts. You will notice in the third column, is the ‘Firing Triggers’ column. In order for a tag to be used, it has to be triggered by some sort of event.

Google Tag Manager tags
Tags page of our GTM account.

What is a tag?

A tag is basically HTML or javascript you execute when the trigger happens. If you have ever had to add tracking code, or some sort of code to the footer of every page, once you have Google Tag Manager installed you can add it from there. The upside of using GTM is you can see what tags get fired when instead of having it hidden throughout your code.

If you have ever ran ads either on Google Adwords or Facebook, you know you need to add pixels and conversion tracking to help track how well your ads perform. Depending on the complexity of your setup, this could be achieved with no coding on your end.

What is a trigger?

A trigger is an ‘event’ that happens, and when it happens it will load a tag. Google Tag Manager comes with a ‘All Pages – Page View’ trigger out of the box. This trigger is used whenever you need some tag to fire on every single page.

You can have all sorts of triggers, such as form submissions, clicks to certain elements or links, custom events you send yourself, even timers that fire every so often.

In the image below, we have defined 2 triggers. The first trigger happens when our form with and id of “registerform” is submitted. The second trigger is a page view but when the URL is specifically our registration page. When each of these triggers are true, they each fire a tag.

Google Analytics Triggers
Google Analytics Triggers Page

Below we can see what tags the triggers fire. The ‘Facebook Pixel ViewContent’ tag is fired for the ‘Registration Page View’ trigger. As mentioned above, this trigger happens when you land on the page with ‘/register’ in the URL. Next we see the ‘GA – Register Form’ tag is fired when the ‘Register Form Submission’ trigger is used.

GTM Tag Example
Example Tags

Why use Google Tag Manager

If you are uncomfortable with editing your website, Google Tag Manager gives you an easy way to add some integrations. If you pay a company to manage your website for you, this allows you to add those integrations without having to pay a fee for a simple “add this script here” request. You can do it yourself, or have a whiz staff member do it.

Once you understand the concepts between tags, triggers, data layers and what not, you can unlock a lot of tools and not have to worry about code or updating your website.

What I use Google Tag Manager for

I use Google Tag Manager for some basic things. On TodoSage.com for example, here is what I use:

  1. Google Analytics
  2. Sending events to Google Analytics I want to track (see the register form submission trigger above)
  3. Facebook Pixel and ad tracking
  4. Hot Jar heatmap tracking

Most of these are simple embed scripts on every page and they ‘just work’. When you are just starting out, you don’t have to go crazy with your implementation. Start small and add more over time if you need to.

It’s best to only add things you need and are going to use. If you have noticed all those “we use cookie” banners, those happened because of websites doing all sorts of tracking of you that you don’t know about. It resulted in countries finally taking issue with it and demanding more transparency.

Gutenberg blocks disabled, thoughts after I fixed it

Standard

When I first experienced Gutenberg when upgrading to WordPress 5 it was a terrible experience. The ‘+’ new block icon didn’t work, and I couldn’t figure out how to add any blocks. It gave me one to jam everything in.

It turns out I had the visual editor disabled in my user profile. I imagine I did that at some point in the past so I didn’t have to fight with TinyMCE but totally forgot about it.

Disable visual editor was disabling Gutenberg

After I enabled it, the blocks started working. Now, let me tell you what, Gutenberg is pretty awesome. I did my first post with multiple blocks and it made life so much easier.

I imagine it will greatly mess with the other page builders that go over the top, but Gutenberg definitely makes it feel more natural when adding long form content.

Advice for WordPress/Automatic/Gutenberg Team

Please, please, please, for the first time a user loads the editor page and has the visual editor disabled, show some sort of warning and just don’t show the ‘+’ new block button. It was extremely confusing and frustrating.

Gutenberg image block